
Configuring CLION for STM32 development
Finally. it really took longer than I expected to figure it out.
I suppose the outline is a imitation of his article. I’ll try to form my own one in the future.
Table of Contents
N. Prologue
You may assume it’s not necessary, but I just like to continue from where I left.
Well the main reason is that I simply uses MacOS more. Yeah, despite the fact that I have a physical WINDOWS machine, but it’s like 10 meters away from me. Just very ridiculous considering I need to run over to see the board myself to get some feedback every time. So that’s a no.
CLION have pretty much everything a modern IDE should have, with nice plugin support. Keil is just a little.. out of date, as least to me.
With in the process, I’ve met some problems without direct answer, each one took me approximately a day to solve. As relavant search results including MacOS is limited and most of which weren’t published recently, and it seems that they didn’t encounter the similar situation.
I. Env and tools
Env:
- MacOS - Intel based
Packages:
- STM32CubeMX
- CLION
- OpenOCD
- Arm-none-eabi-gcc
- Homebrew
Hardware:
- A 3-rd Party STM32F103RCT6
- A ST-LINK/V2
Preparation
STM32CubeMX
Download the latest release from official website: here
CLION
Same as above: here
OpenOCD
1
$ brew install openocd --HEAD
Please be sure to append “—HEAD”. As for the reason, check Troubleshooting - I
Arm-none-eabi-gcc
1
$ brew install arm-none-eabi-gcc
If brew is used, packages should be linked automatically and there’s no need to configure additional environment variables.
II. CLION
Set a new toolchain
Preferences - Build, Execution, Deployment - ToolchainsAdd a new profile with the name you would recognize.
default CMake option
Bundledshould work fine.Set
C/C++ Compiler,Debuggerinto corresponding ones which you may find at wherearm-none-eabi-gccis.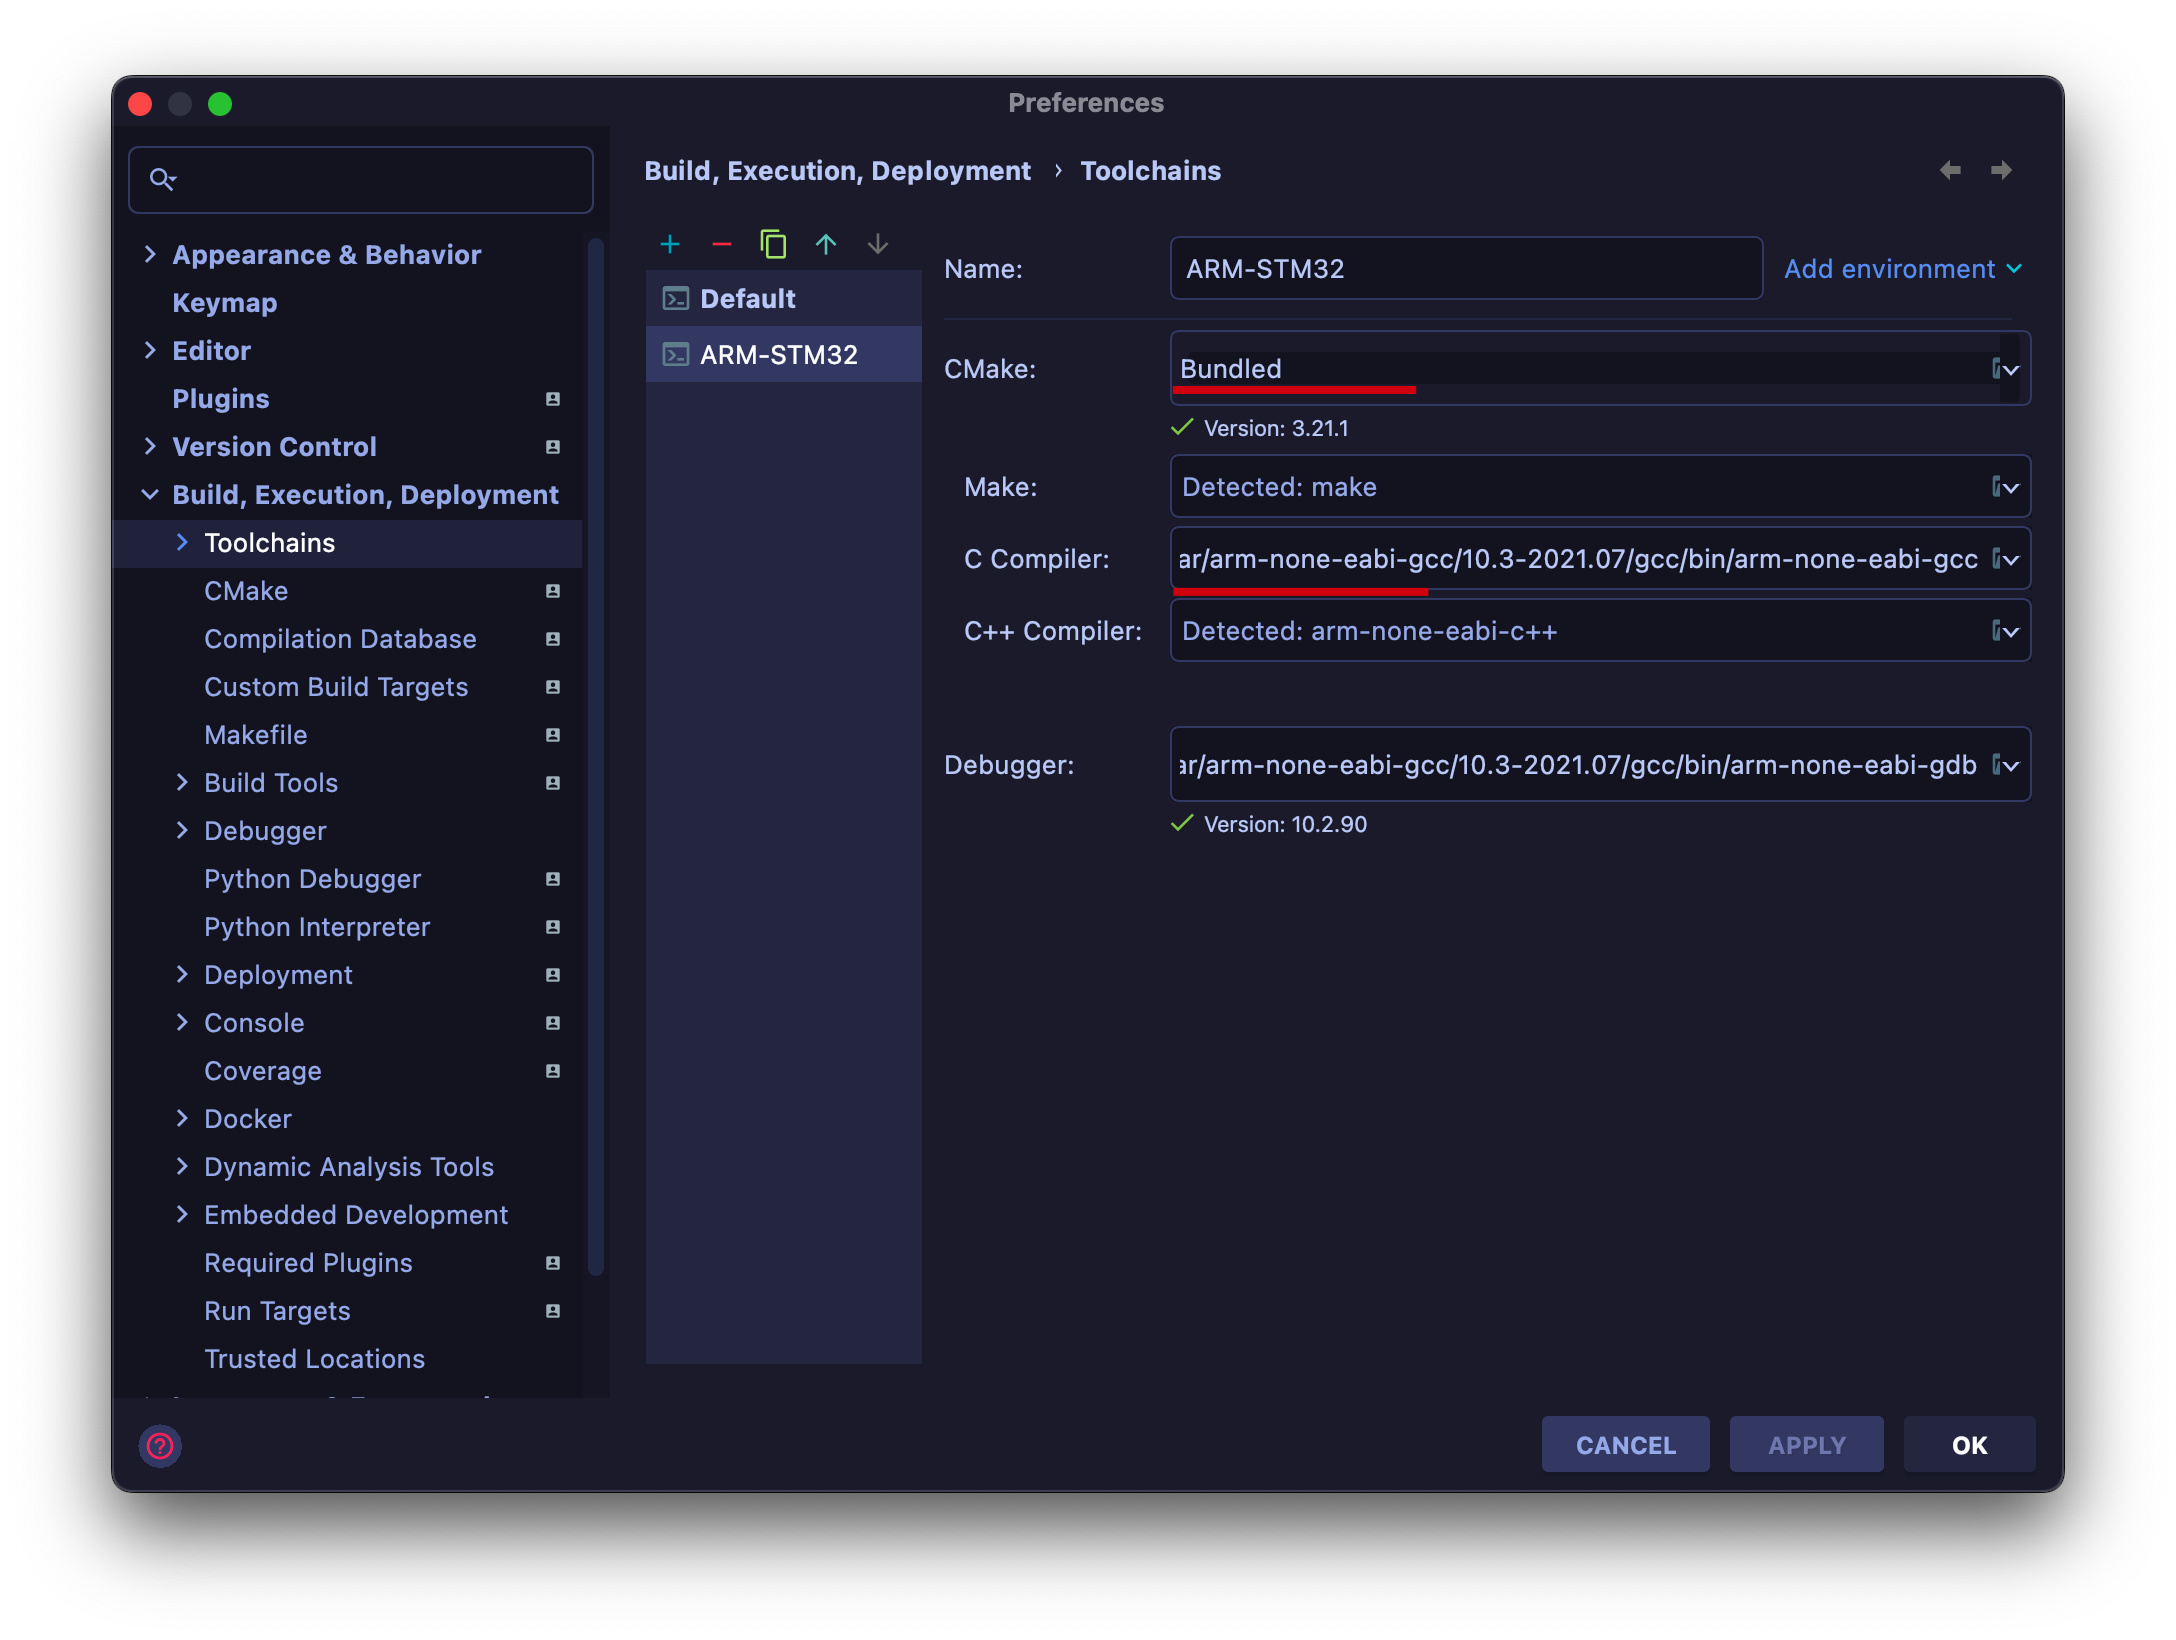
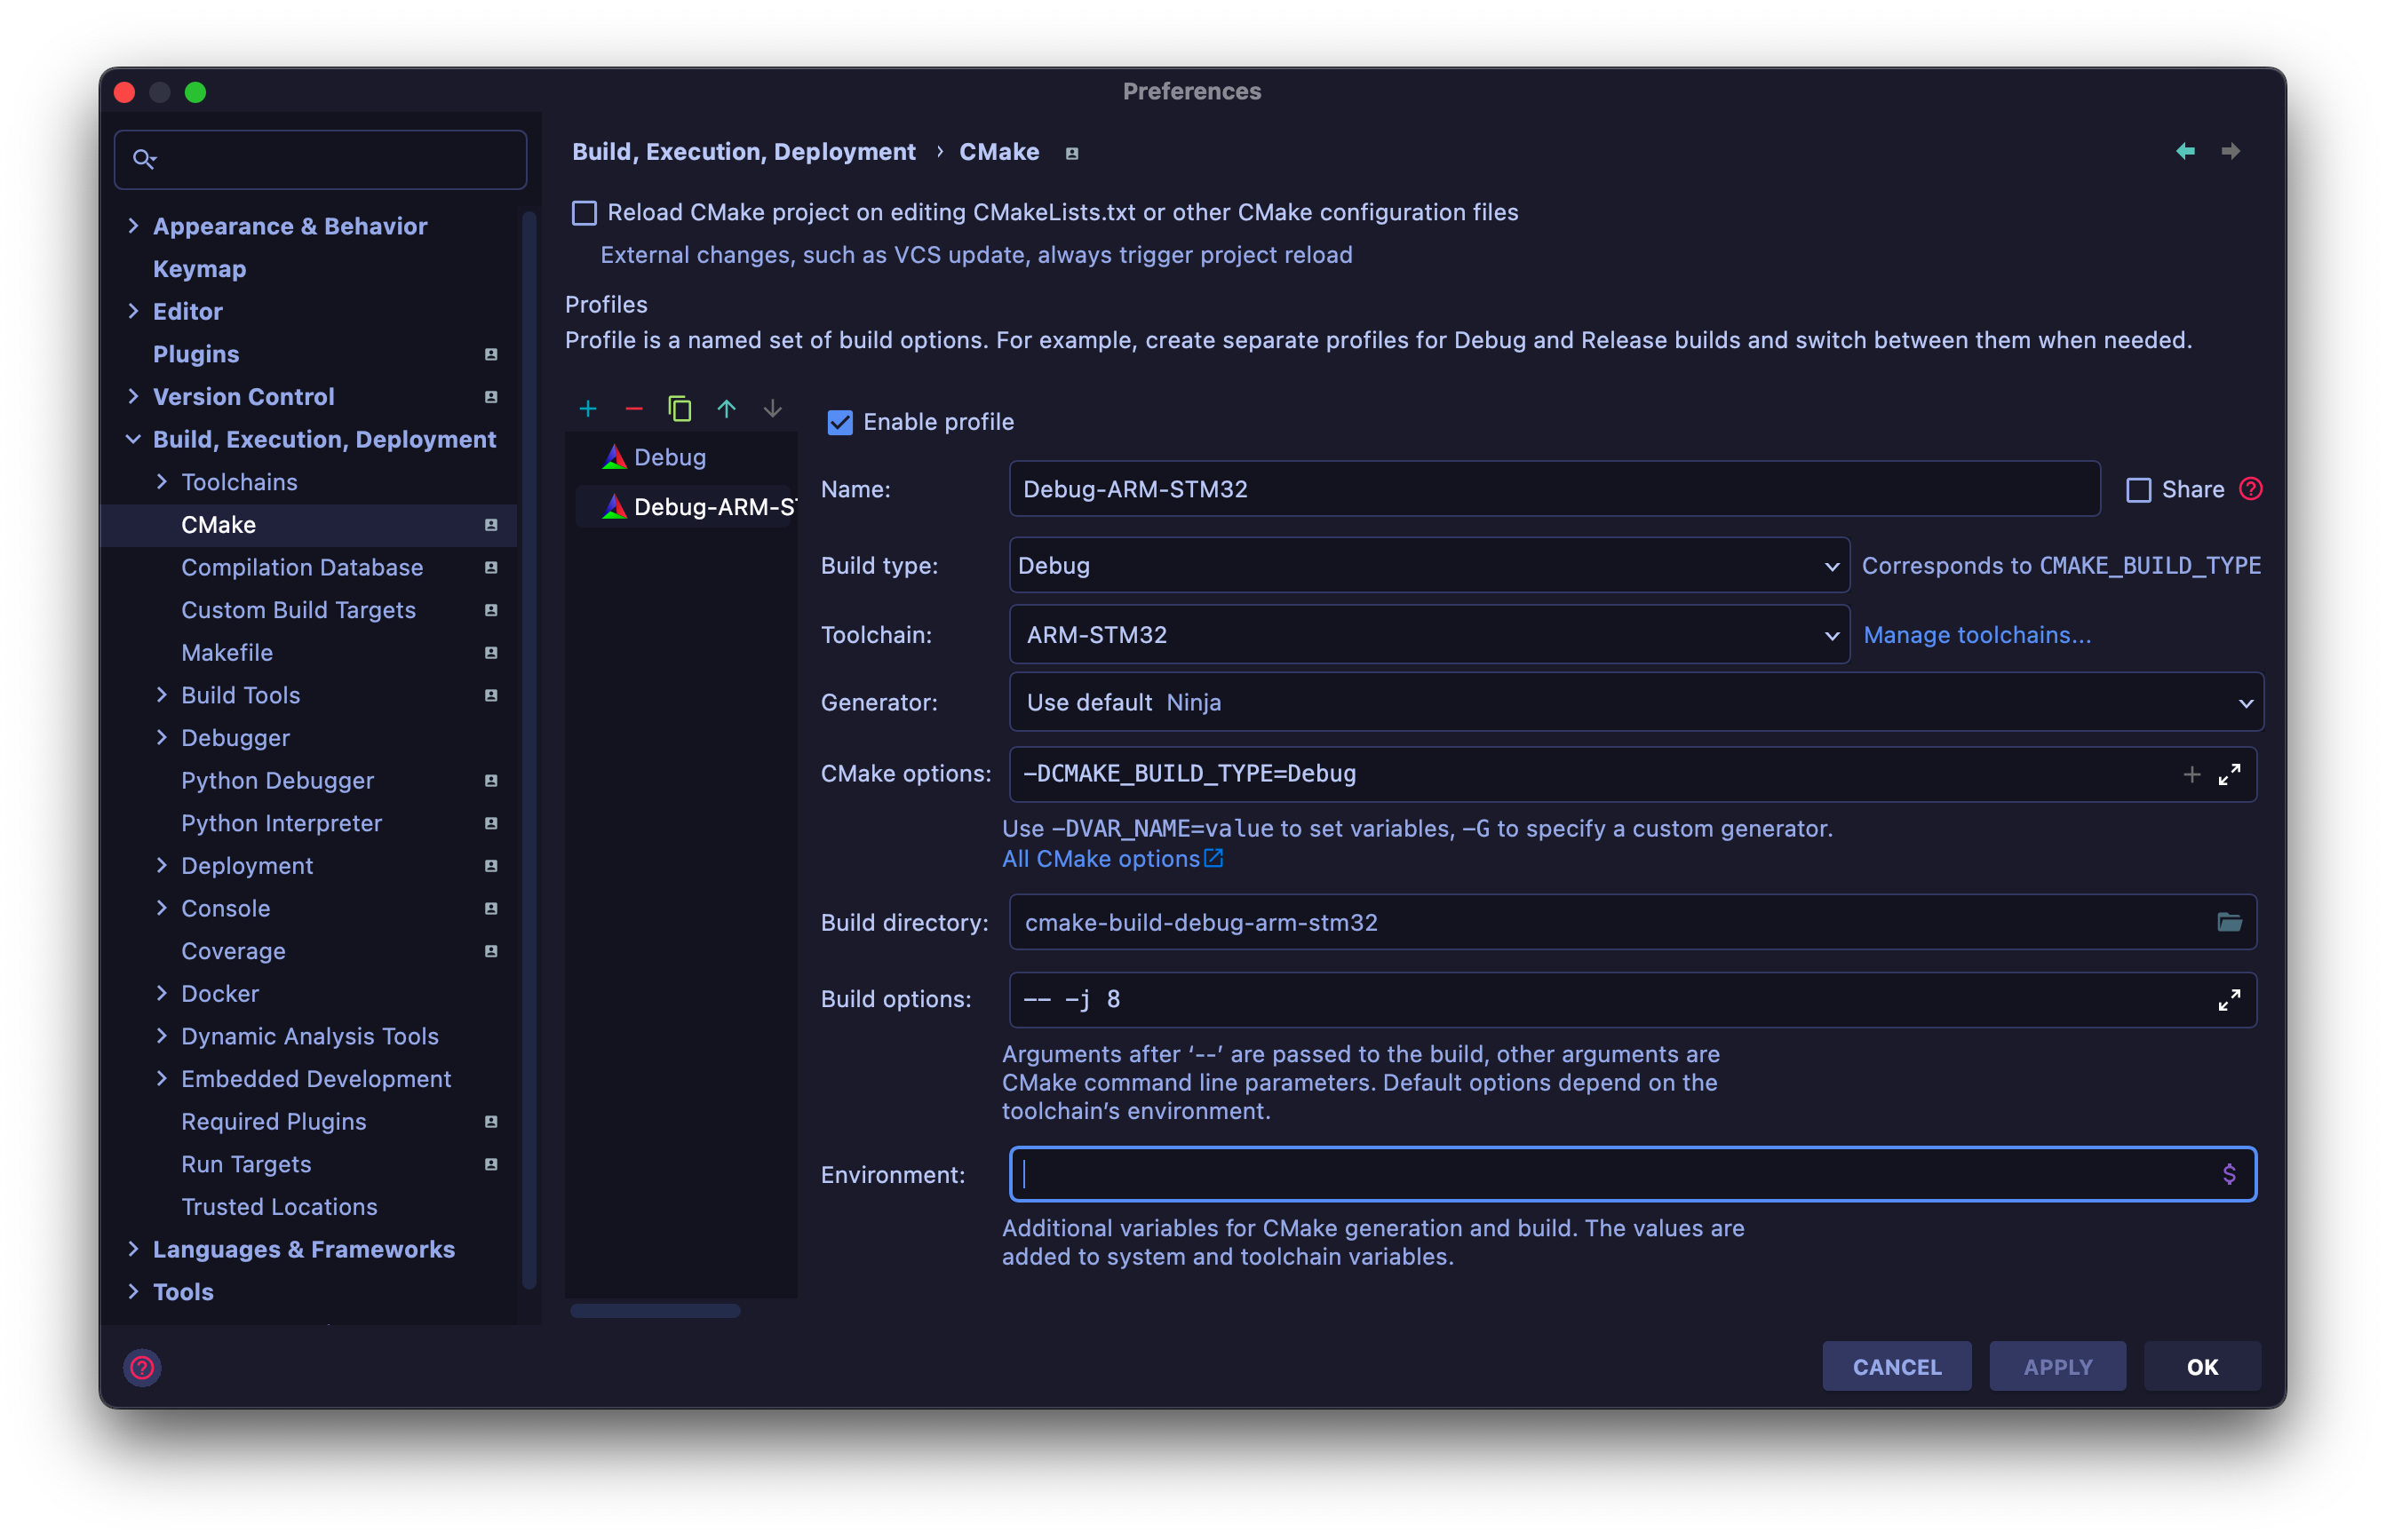
Set a new CMake profile
Create a new one with previous toolchain.
Create a
STM32CubeMXproject.Click on the
*.iocfile, then proceed withOpen with STM32CubeMX
III. STM32CubeMX
Just take turns.
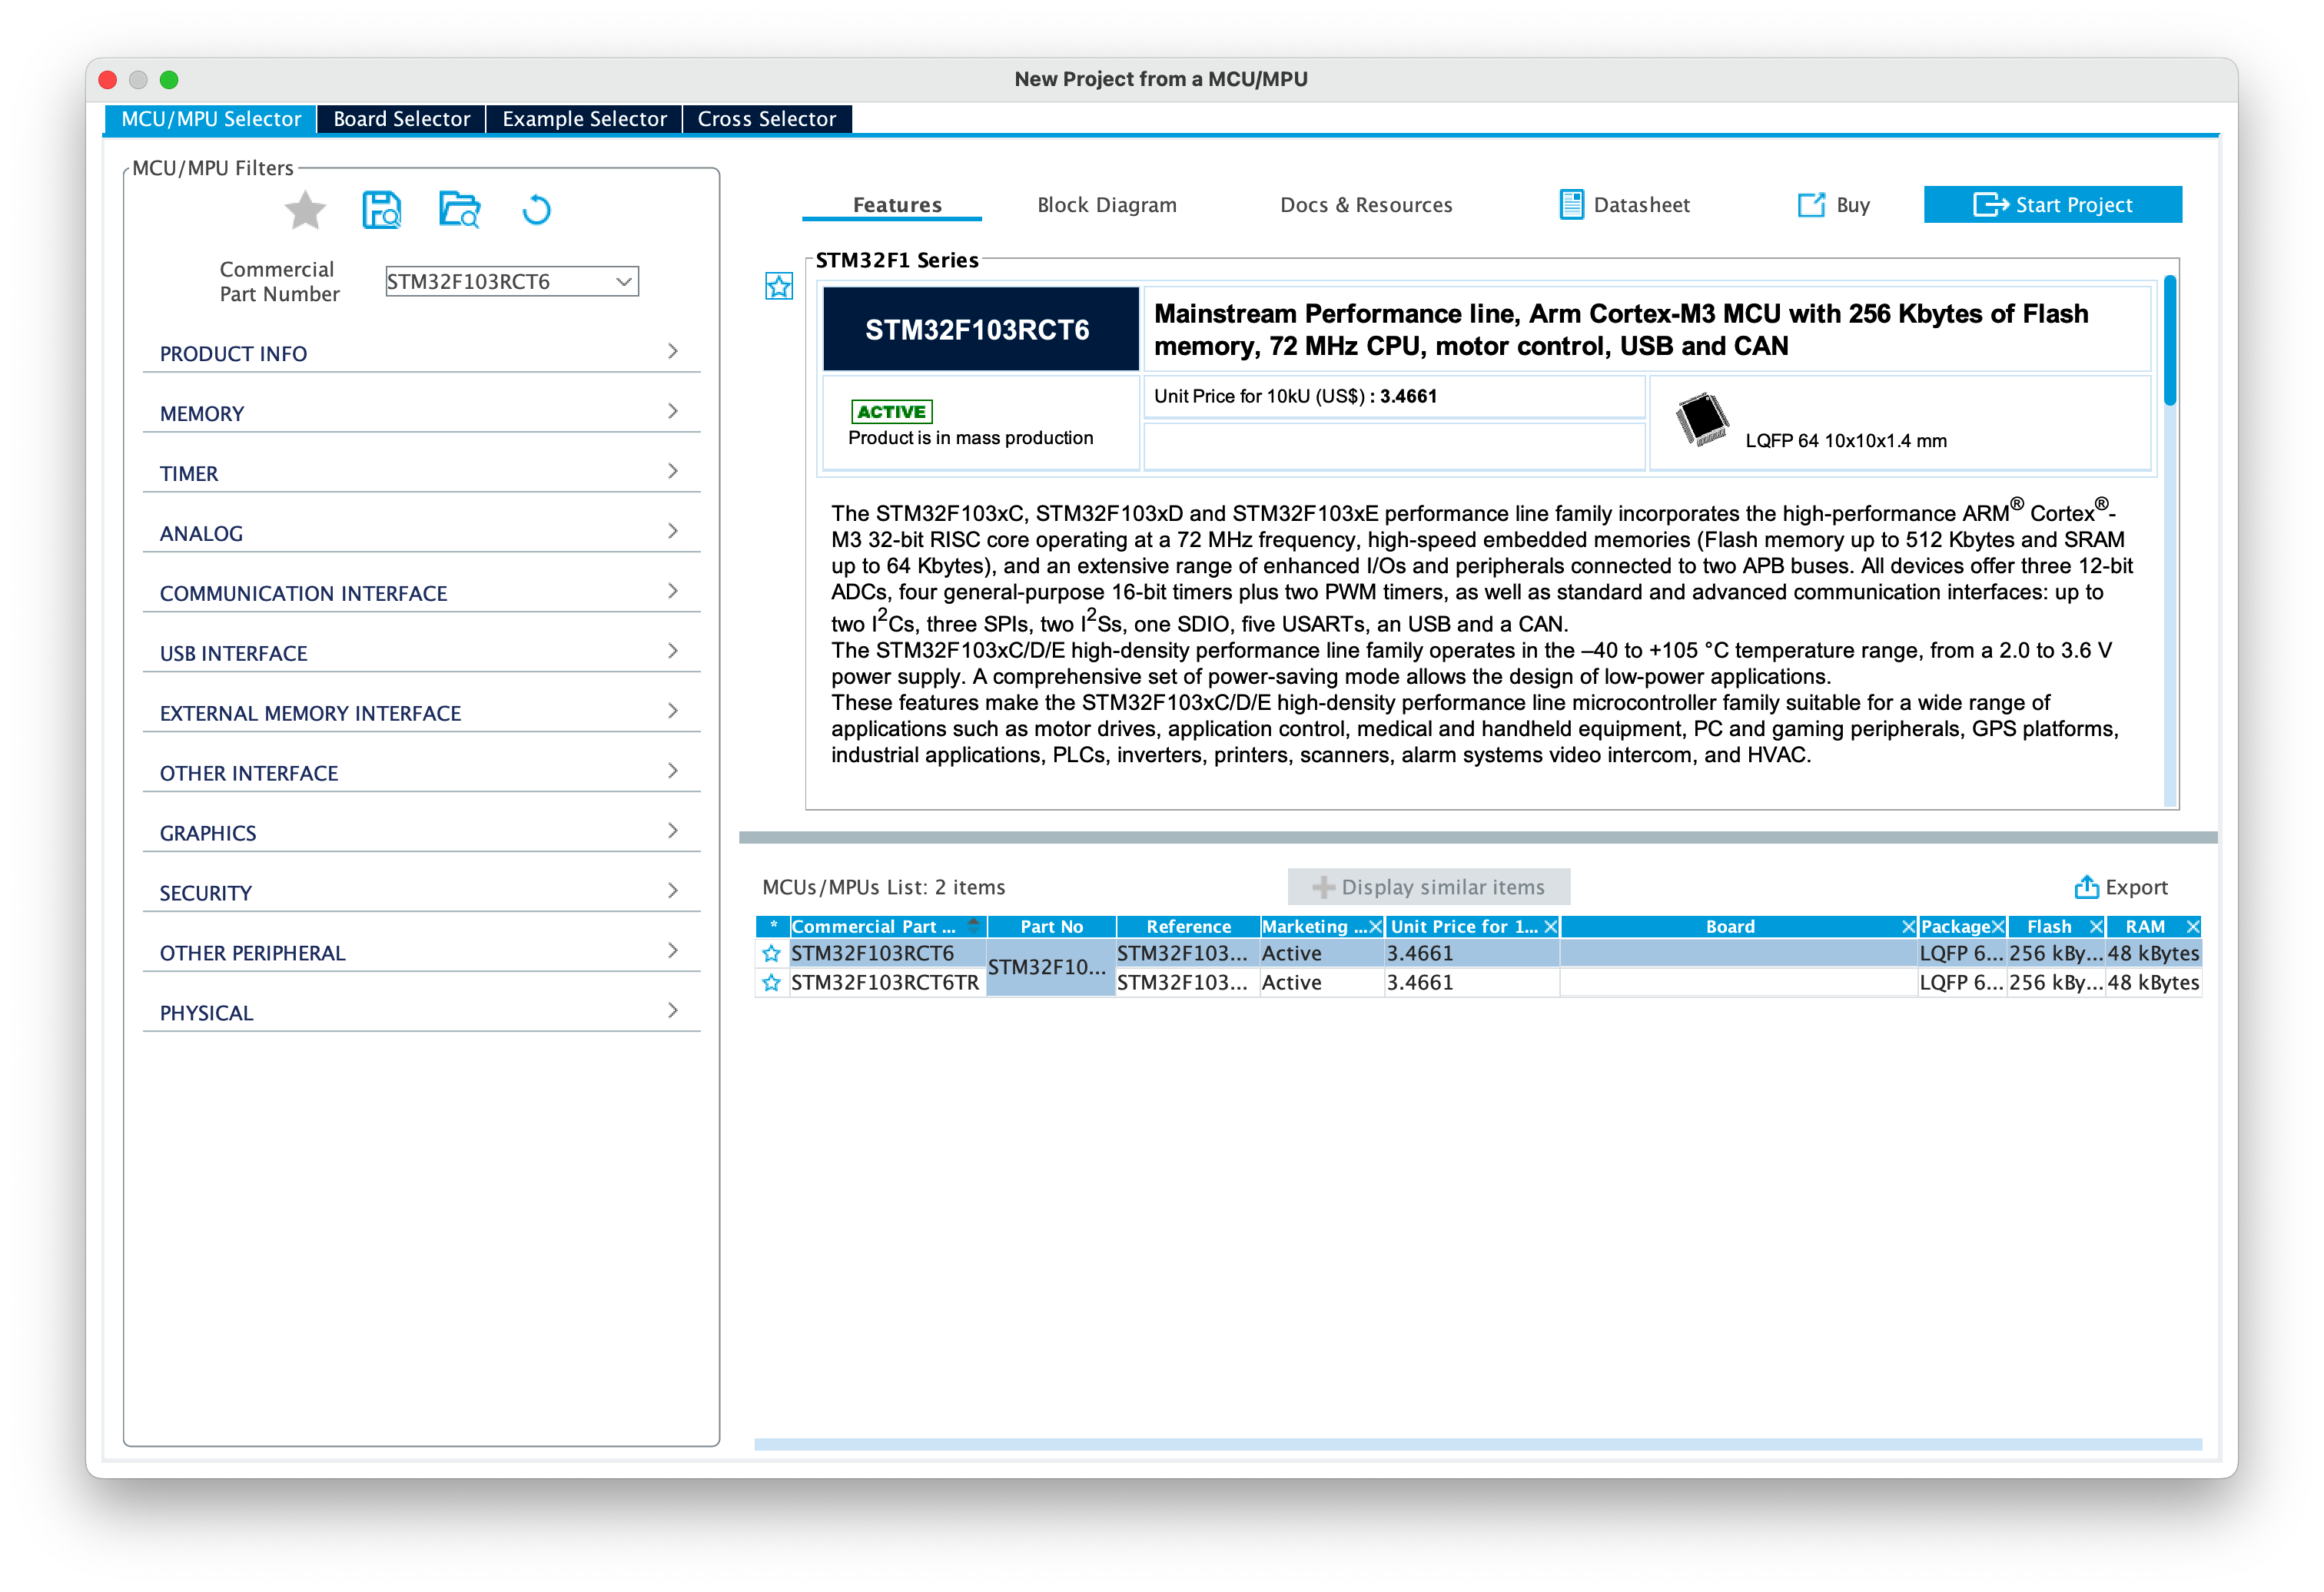
Download MCU Packages
If you were the first time open this software, this window may pop up, just select the series you need. In my case, it’s
STM32F1 Series.Select the corresponding MCU
The default one should be different with what you got.
Switch to tab - Project Manager
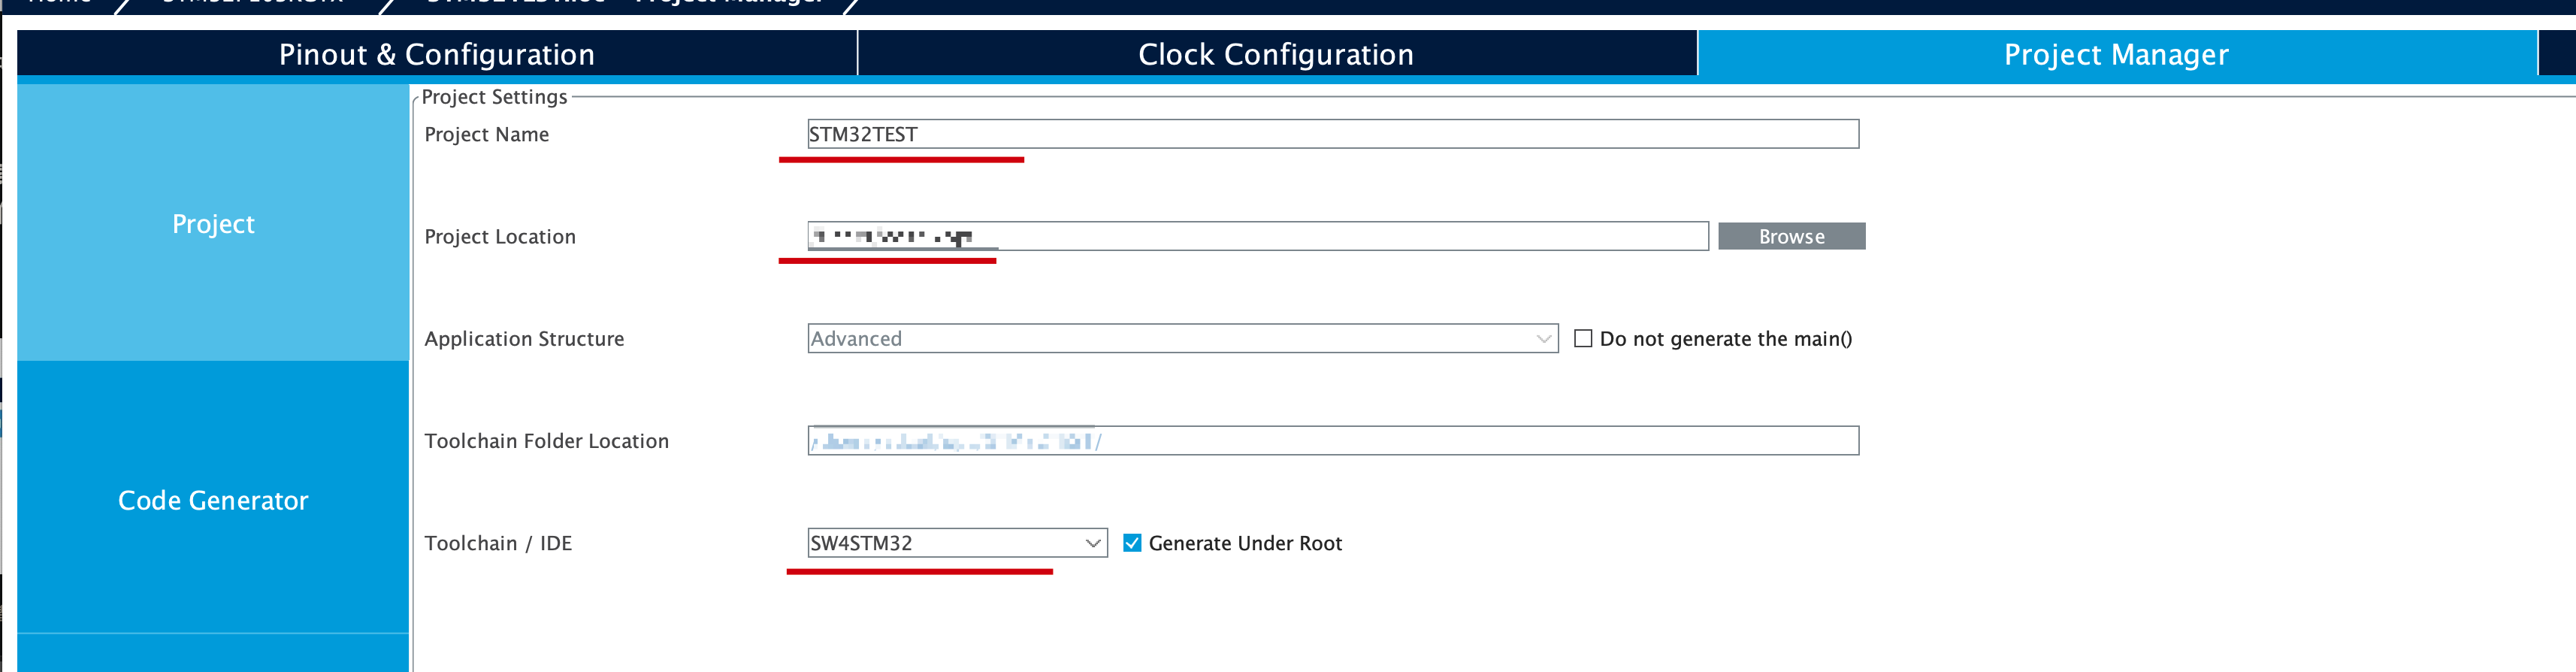
Make sure the
project nameandproject locationmatches info in CLION.Select SW4STM32 in Toolchain/IDE.( Not that necessary, in new version the default works fine)Click Generate Code on upper right corner
Before doing so, remember to assign correct properties to pinouts.
And be sure to do this every time you changed some thing in STM32Cube.
Additional Infomation
In some other tutorial, one suggest
- In the same tab above, make sure
SYS - DebugisSerial Wire. This is for the convenience of all the following operations.
(I’m not sure what is the exact effect of the following modification.)
Change theHCLK(MHz)to 72 inClock Configuration- Don’t do this if you’re not clear what you’re doing, see Troubleshooting - II
- Toggle
Generate peripheral initialization as a pair of ‘.c/.h’ file per peripheralinProject Manager - Code Generator. - Change
High Speed ClockinPinout & configurationintoCrystal/Ceramic Resonator
IV. OpenOCD
Heading back to CLION, a pop up window may apper suggest you to select Board Config Files
Because I’m using a 3-rd party board, so Cancel first. But you may use a existing one if it matches.
Before the following operations
Maybe check if CMake returns any error first.
If it does, check the previous steps. But be sure that you are using the right profile.
Click circled button to refresh.
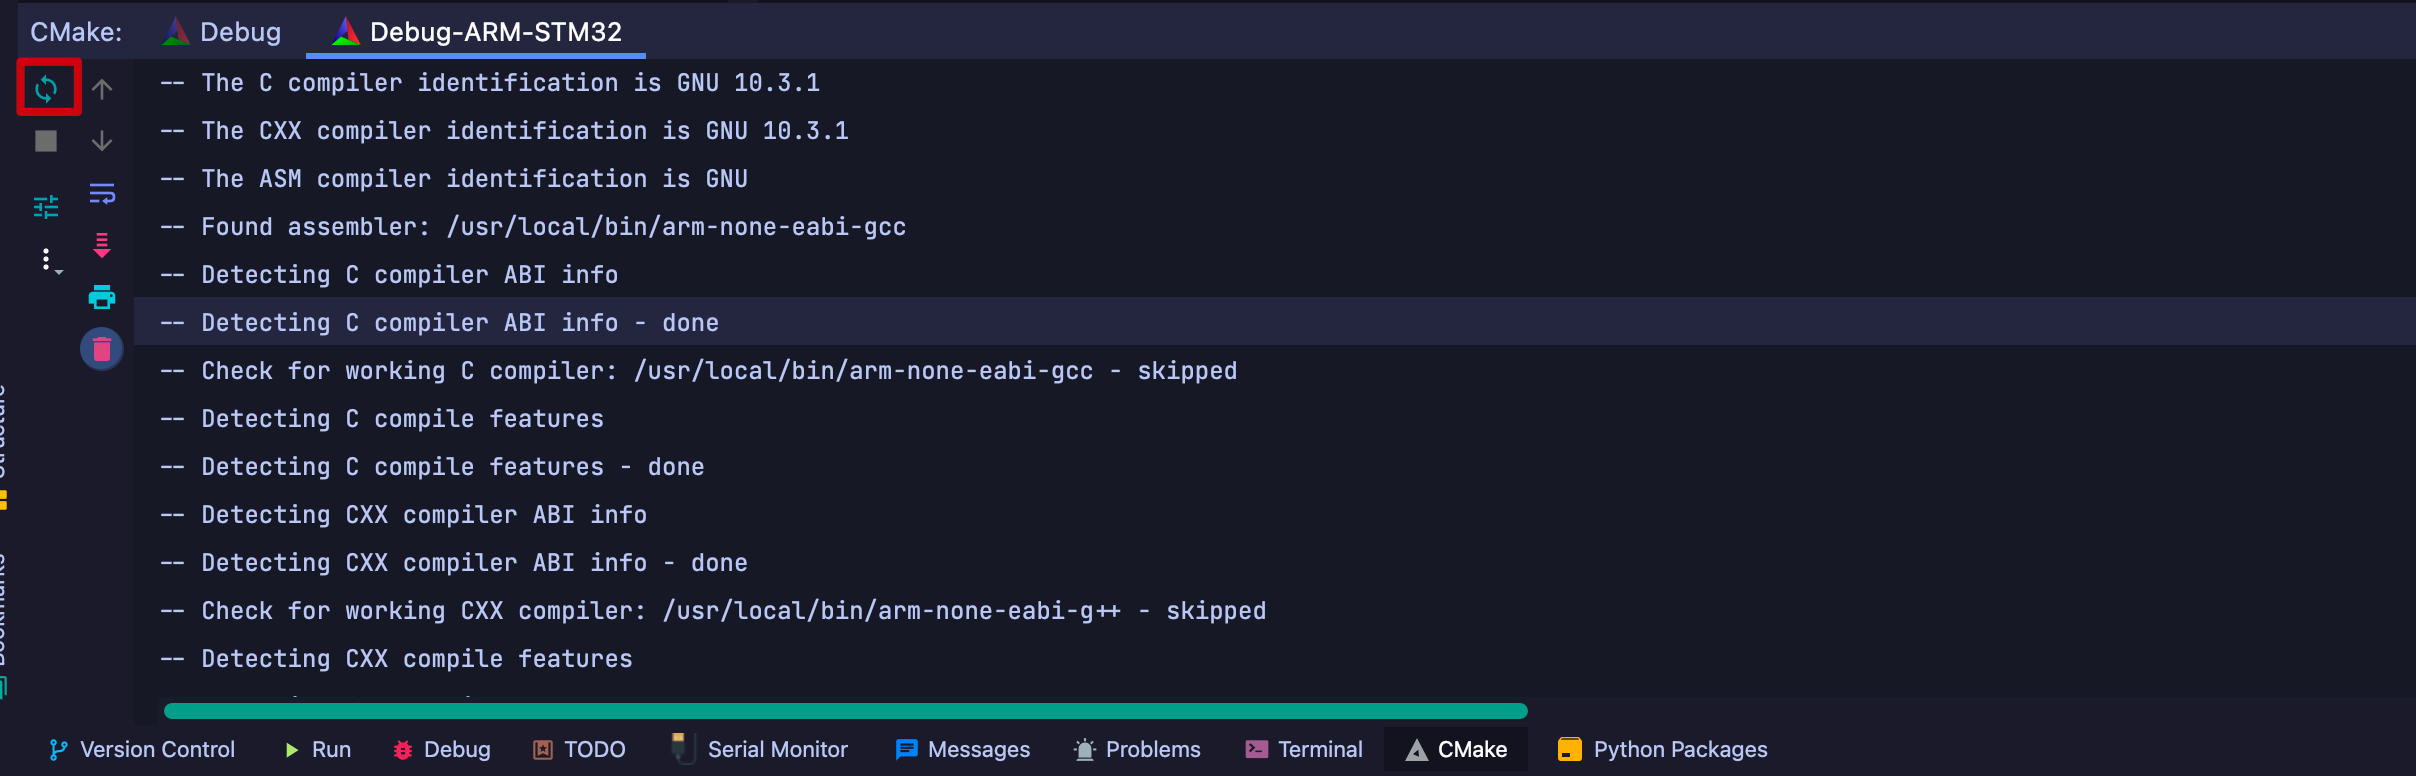
And on the upper right corner, the icon of hammer, triangle and bug, correspond with
Compile,FlashandDebug
Click on hammer, considering nothing is added to the code. You should have the following info.
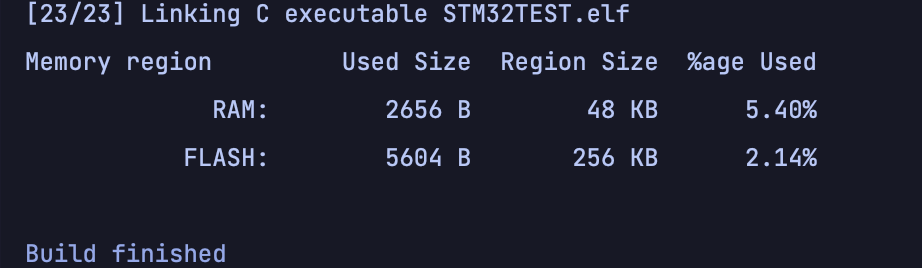
It’s a little different from those shown in other tutorials, no number percentage, no blue characters suggesting the
hexandbinfiles are being built.Despite of this, you should be able to find these two files under the
workspace - xxx-arm-xxxdirectory.Config file
Using CLION to flash and debugging, and actually, you are doing so via
OpenOCDThe mentioned
*.cfgfile is necessary for OpenOCD to operate.Create a folder inside
workspaceor some other place you like. Then create a new fileSomeName.cfgwith the following content ( for ST-link )1
2
3
4
5
6
7
8# choose st-link/j-link/dap-link etc.
# adapter driver cmsis-dap
# transport select swd
source [find interface/stlink.cfg]
transport select hla_swd
source [find target/stm32f1x.cfg]
# download speed = 10MHz
adapter speed 10000Of course, after observing provided cfg files in
installedLocation\openocd\scripts- Board - Configuration of some certified board
- Interface - Configuration of debugger
- Target - MCU configuration
It’s clear that the first line determines the interface and type, while the following are MCU type and download speed.
Maybe it’s better not to add
reset_config sirs_only, which may cause flash to failDebug Configuration
Drag down the menu beside the hammer icon, select
Edit Configurations.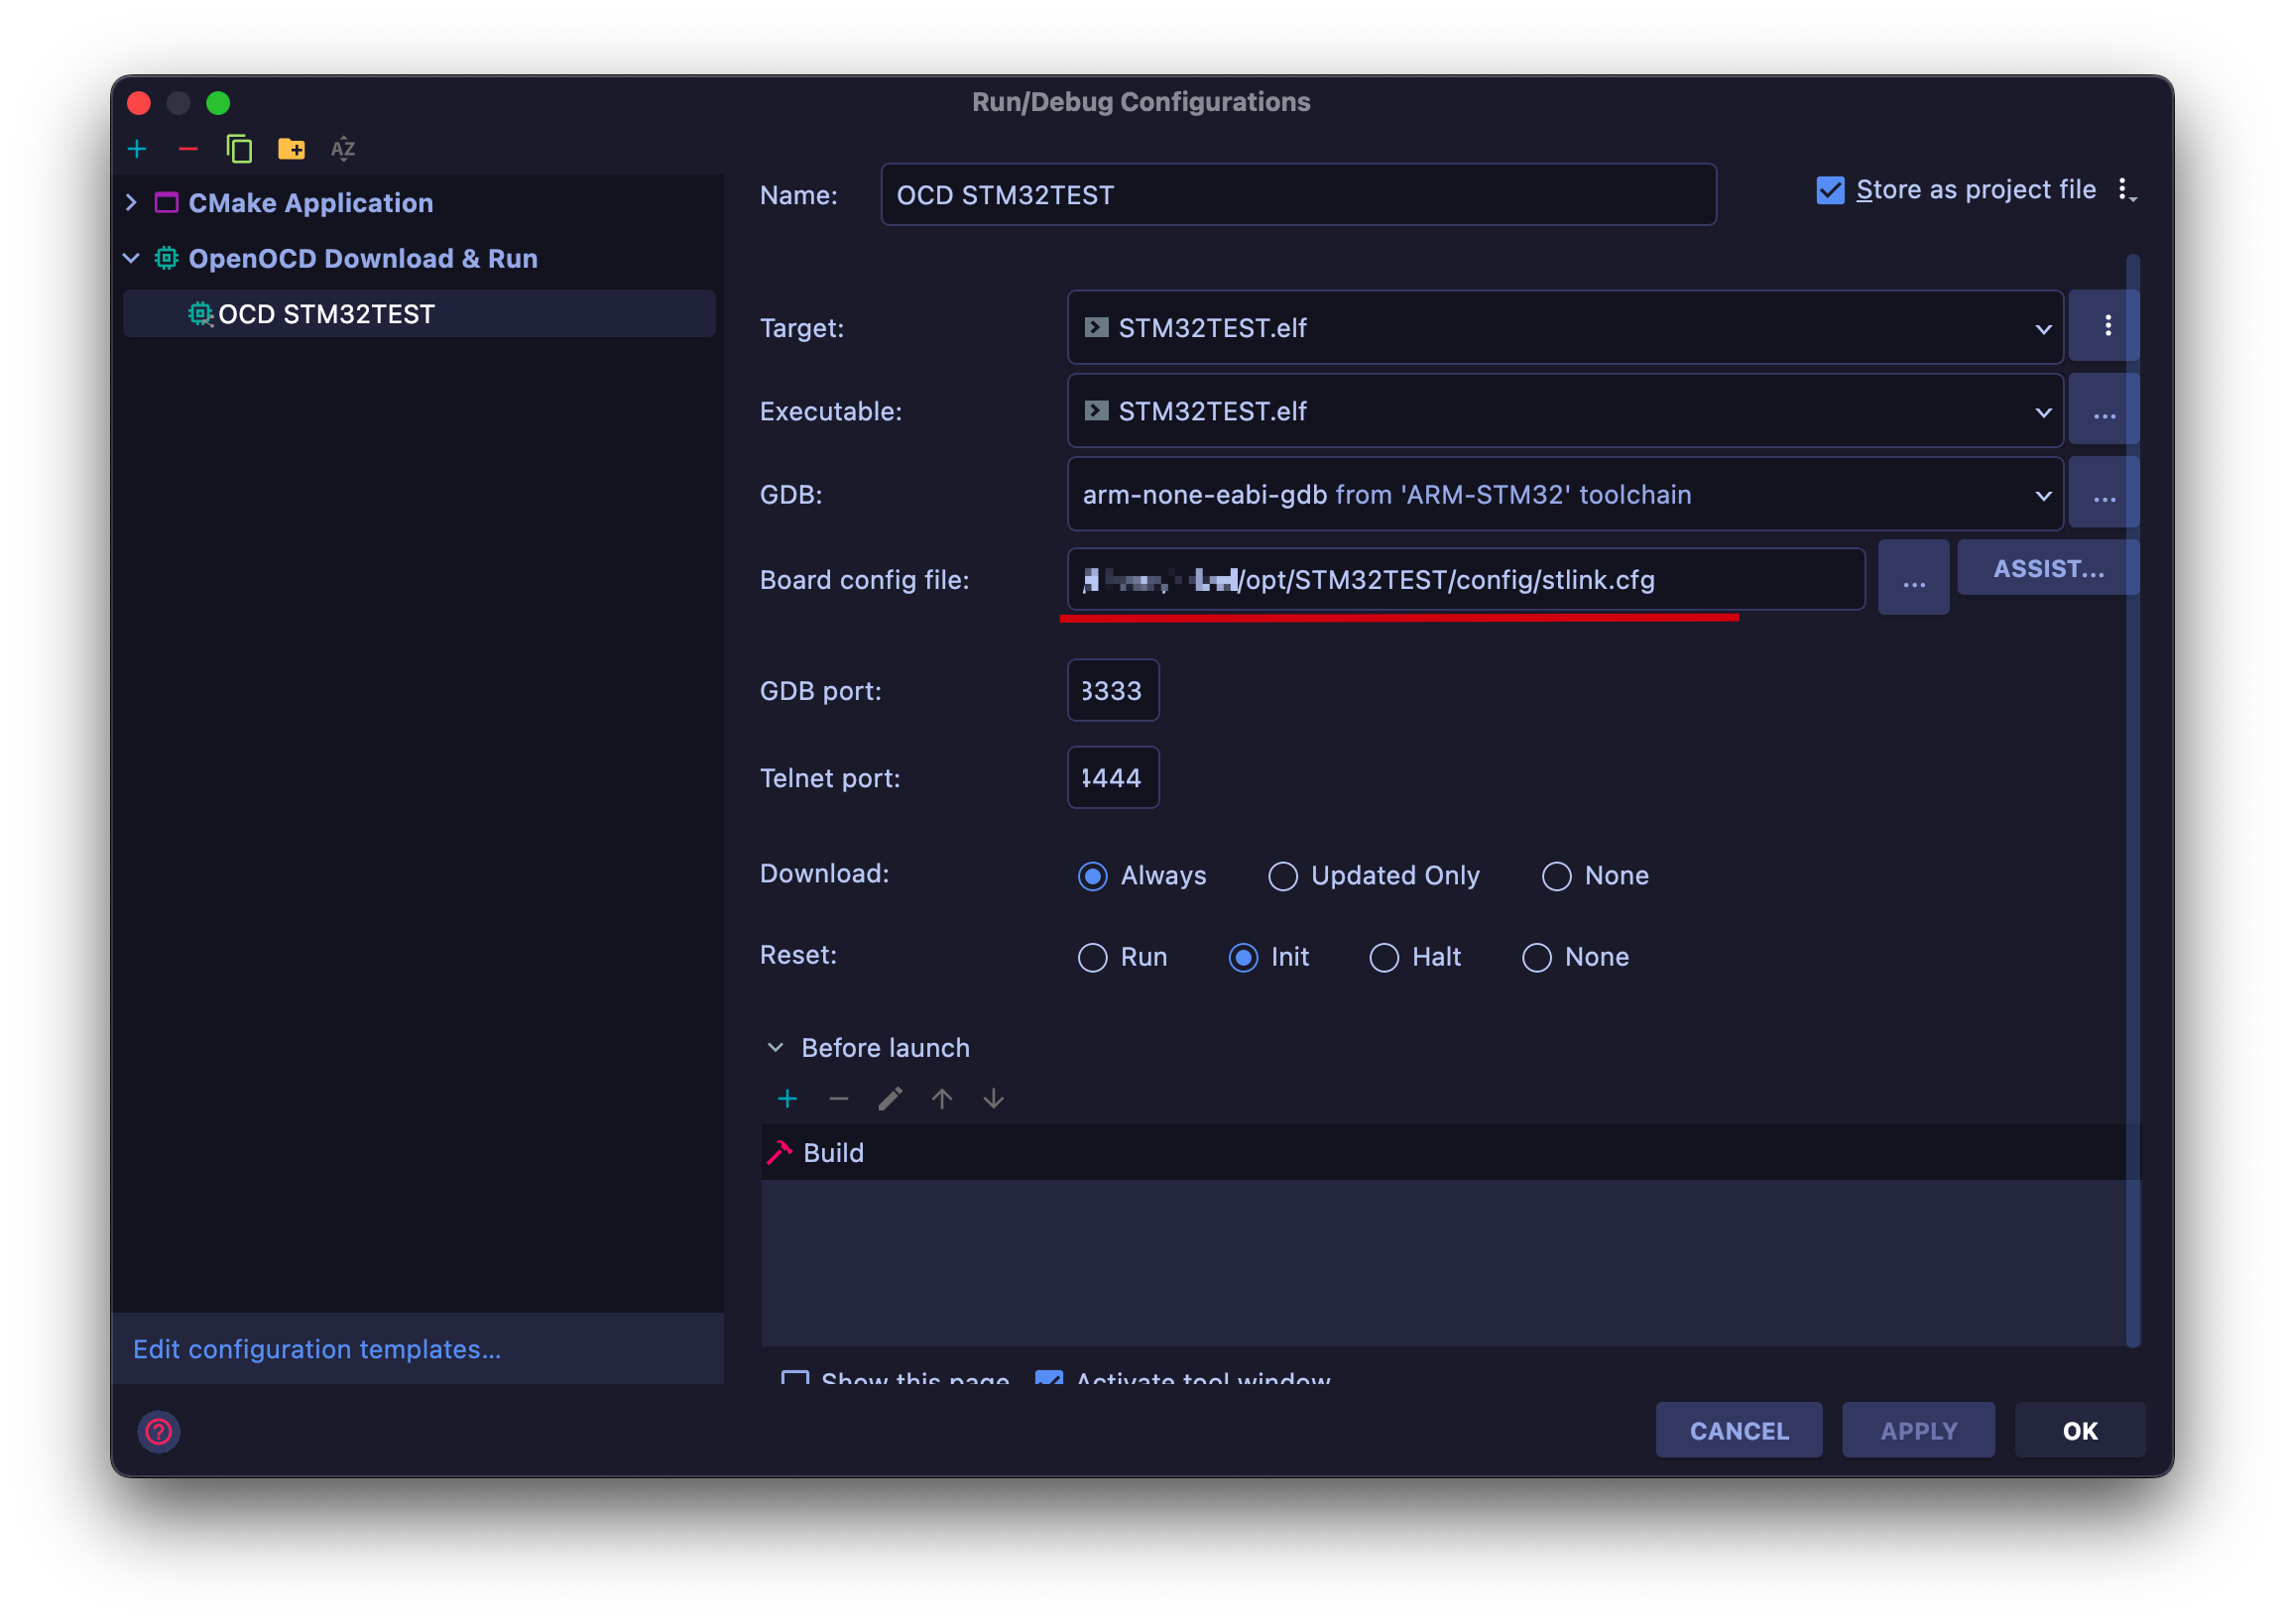
Browse and select the right cfg file.
The whole thing should be ready to go.
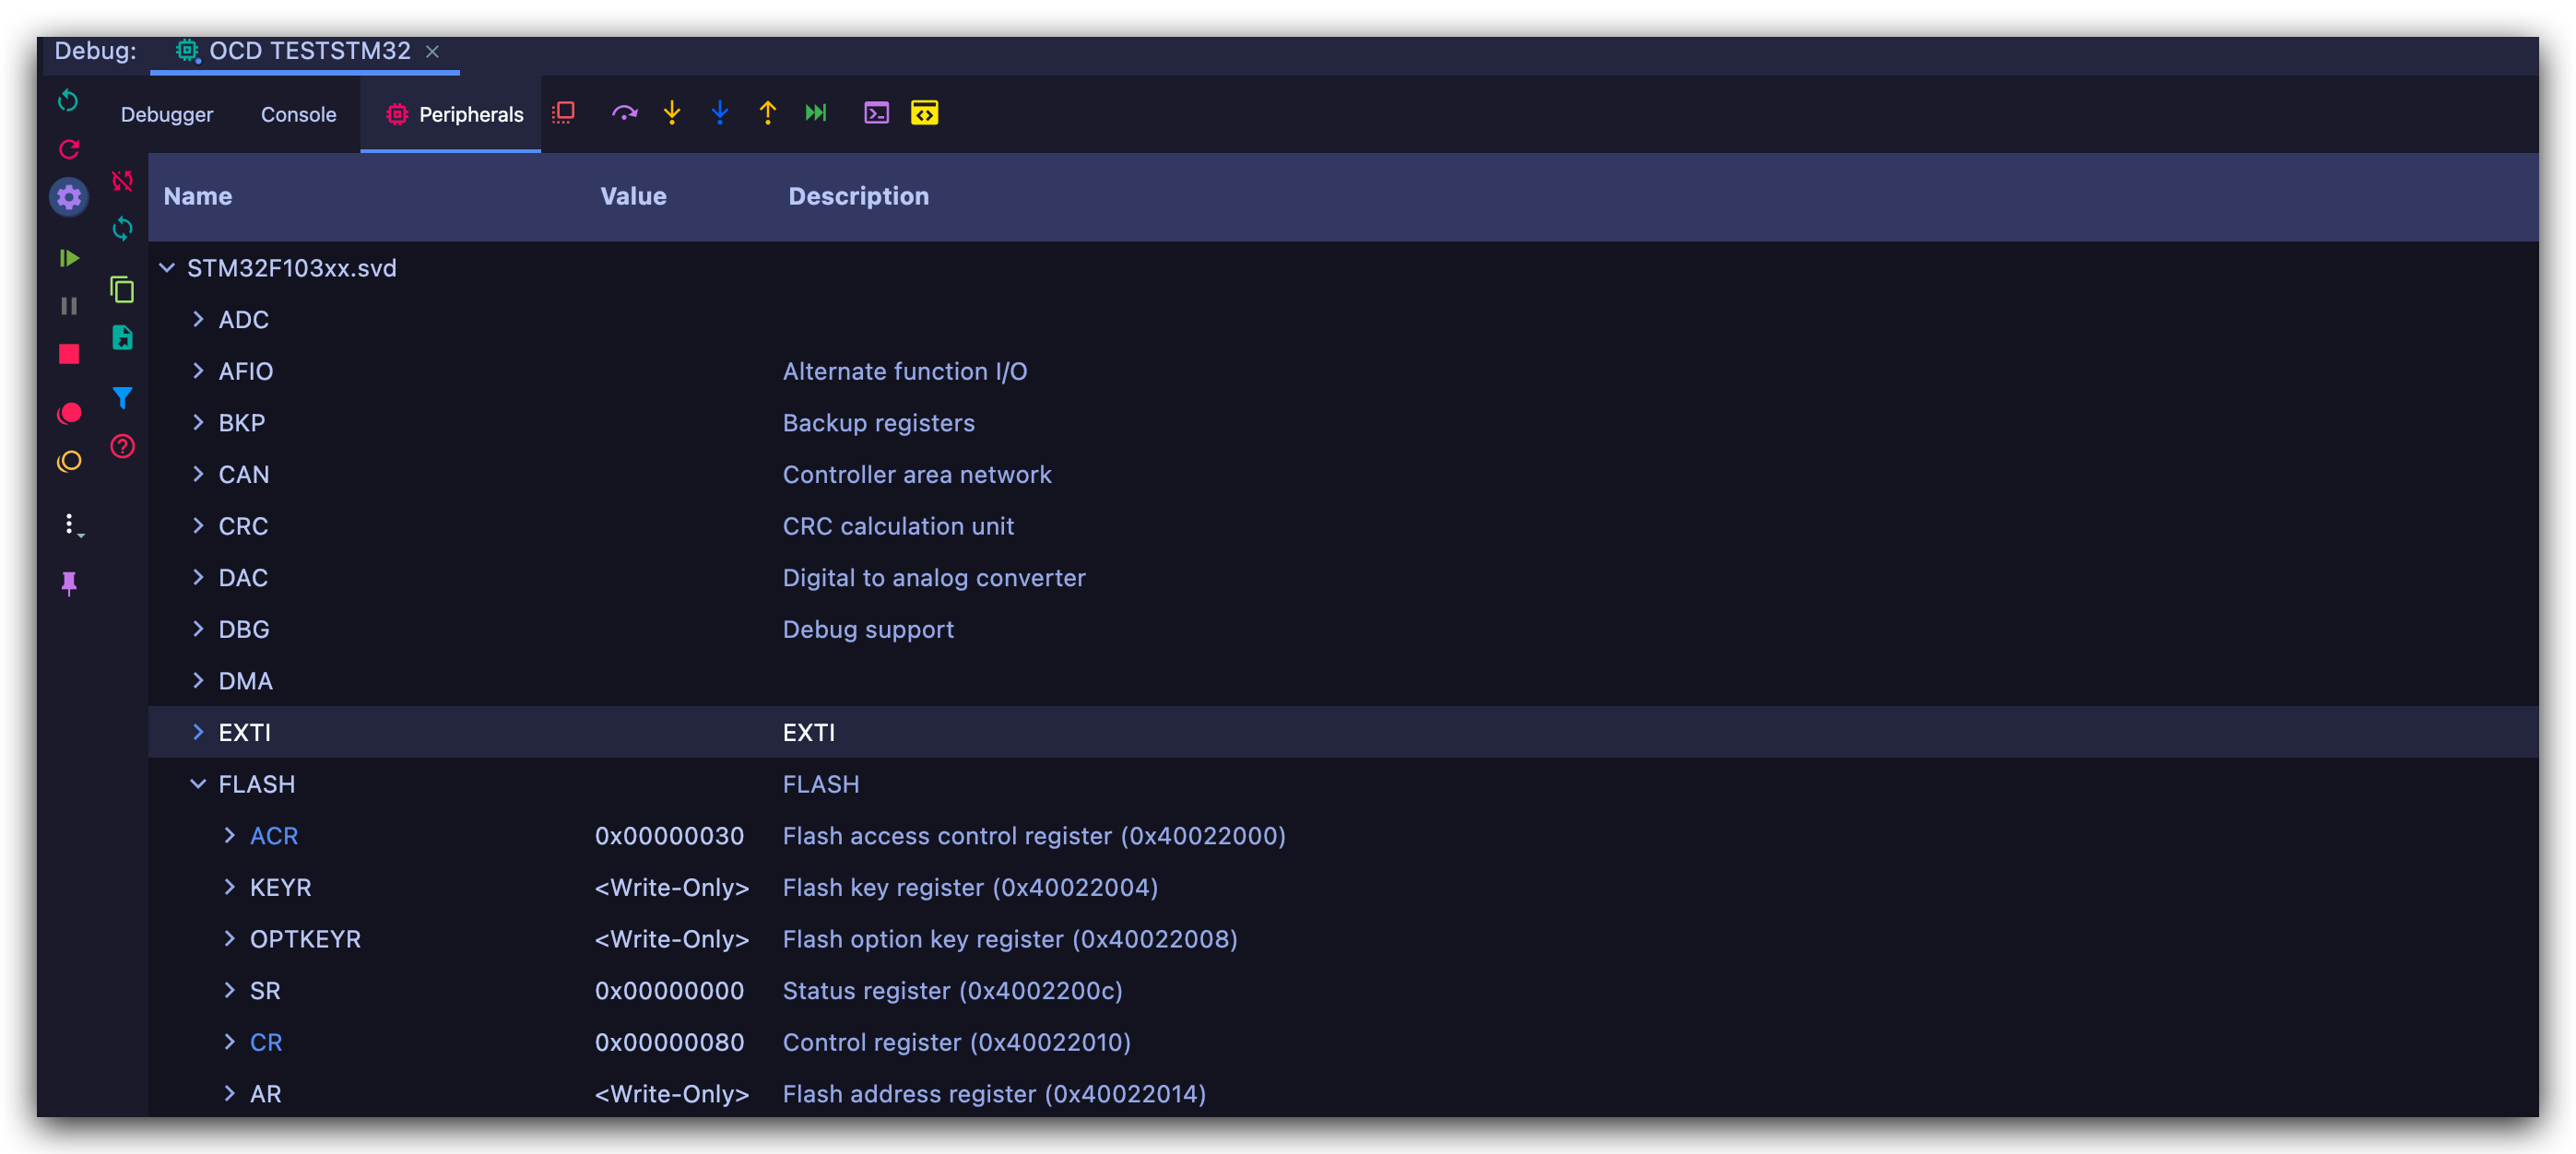
Besides, when in debug session, Peripheral, you may load *.svd files to check registers in detail. SVD files can be found on github or just google it.
Troubleshooting
It all started here:
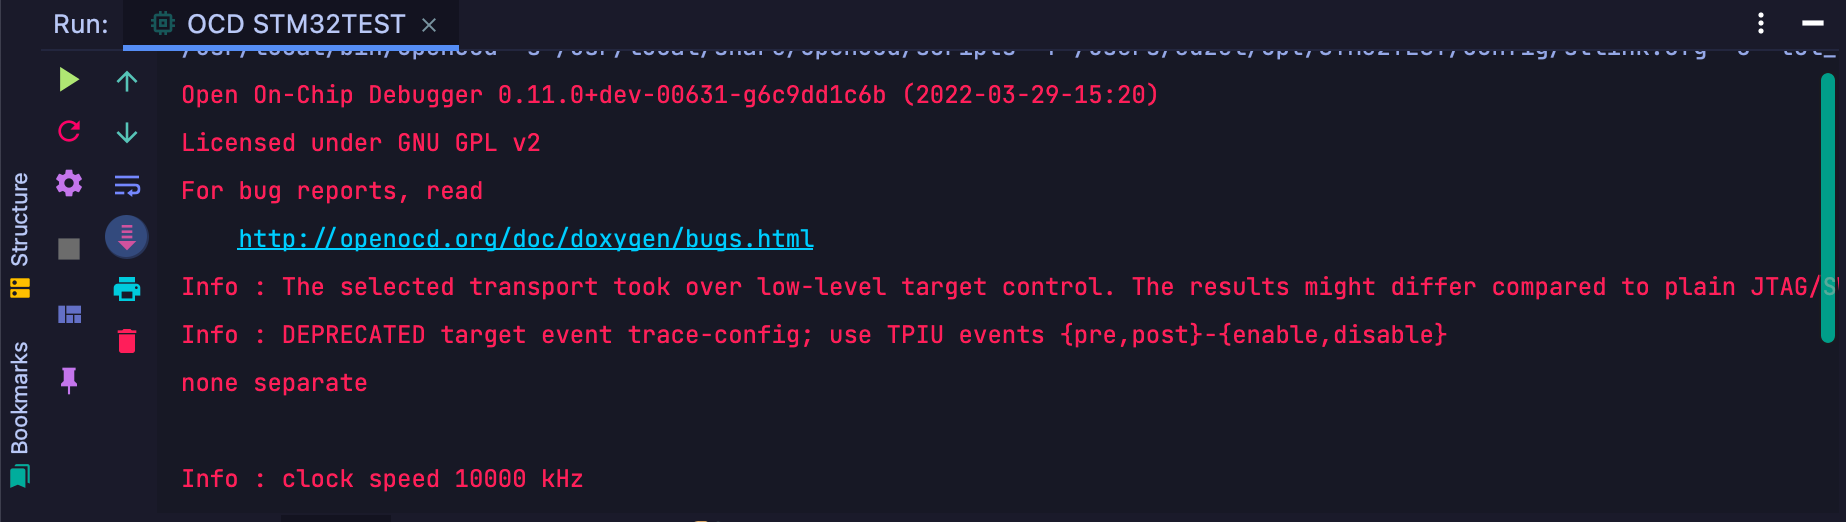
- When trying to flash the
*.binfile, OpenOCD’s output info stopped after showingInfo: Clock speed 10000 kHz.
The screenshot taken is with the latest version, only for demonstration.
It actually quite strange, considering there’s no other error messages anymore.
Checking ST-LINK
At first I doubt that if it was ST-LINK‘s problem, and maybe it’s related to firnware versions. As it’s a second-handed one, and last owner said that it had been eating dust for quite a while.
Firmware
Gladly, firmware update is available on MacOS. Check here
Using terminal commands to open, but be sure to get into the System Preferences, allow relavant dynamic library to run.
Drive
1 | $ st-info --probe |
This command is used to detect info of connected board. If it cannot detect anything, maybe try to reconnect the pins ?
1 | $ st-flash write .../*.bin 0x8000000 |
With this, you can flash built bin into the board, fully isolated from openocd.
For more usage, check the help message after input only st-flash, it provides sufficient examples.
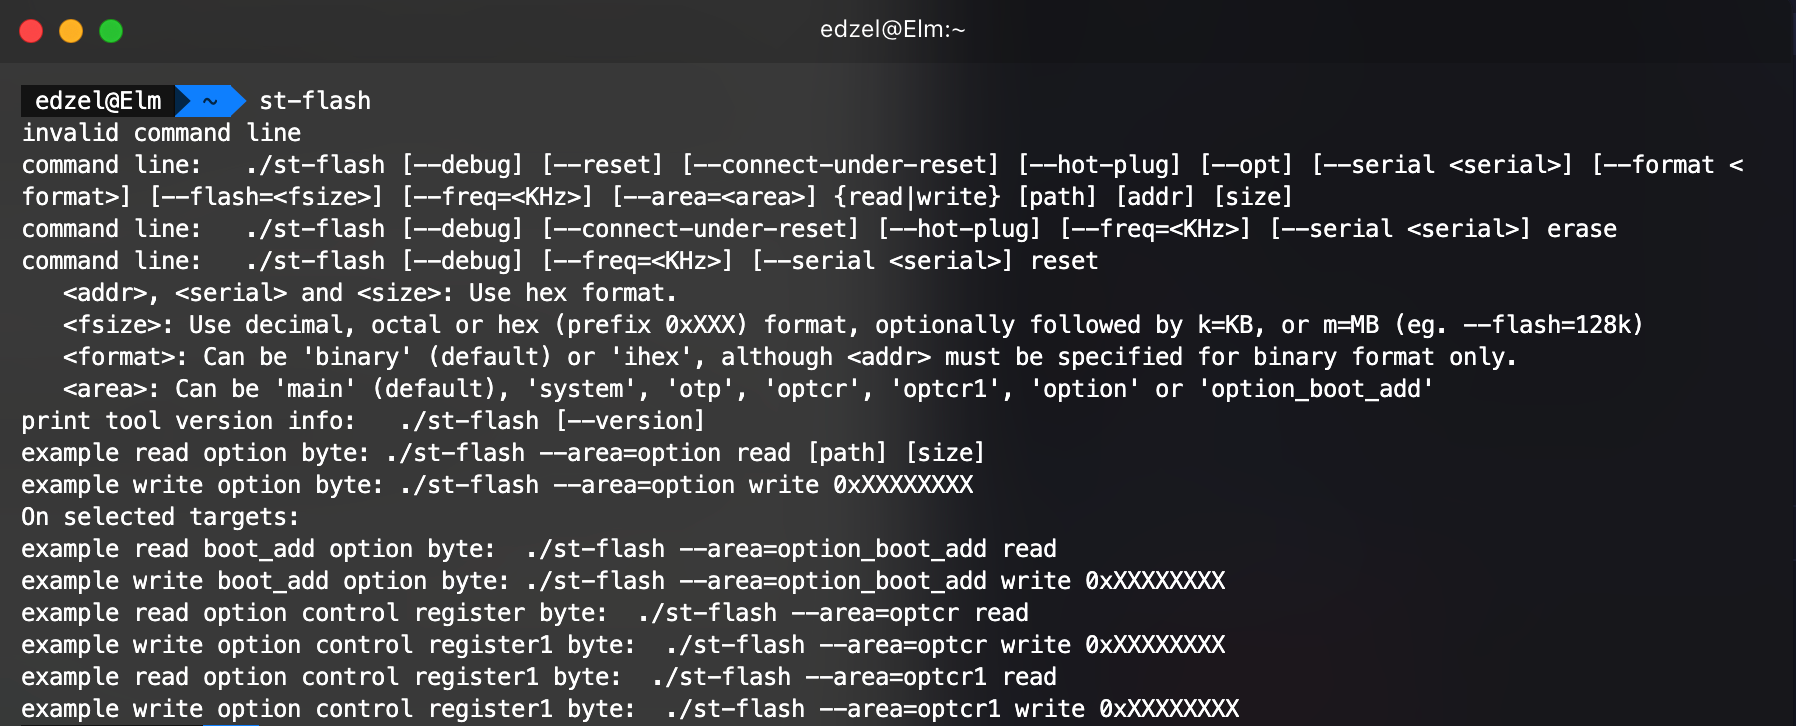
The simple program works fine, so the problem is not on ST-LINK’s side.
Checking OpenOCD
1 | $ openocd [-f interface/stlink.cfg](optinal) -f ../var/yourProfile.cfg |
And bingo.
This time, at least it returns an SEGFAULT error message.
With additional -d parameter, it can return more debug info, but not quite useful for finding the exact problem.
At first I thought it was related to the serial, as in terminal, previous index has a value behind it, but not this one.
After some searching, I found an issue on github , so my guess is wrong, but coindidentally it leads me to the right clue (actually only because it’s in the debugger info, that’s just it).
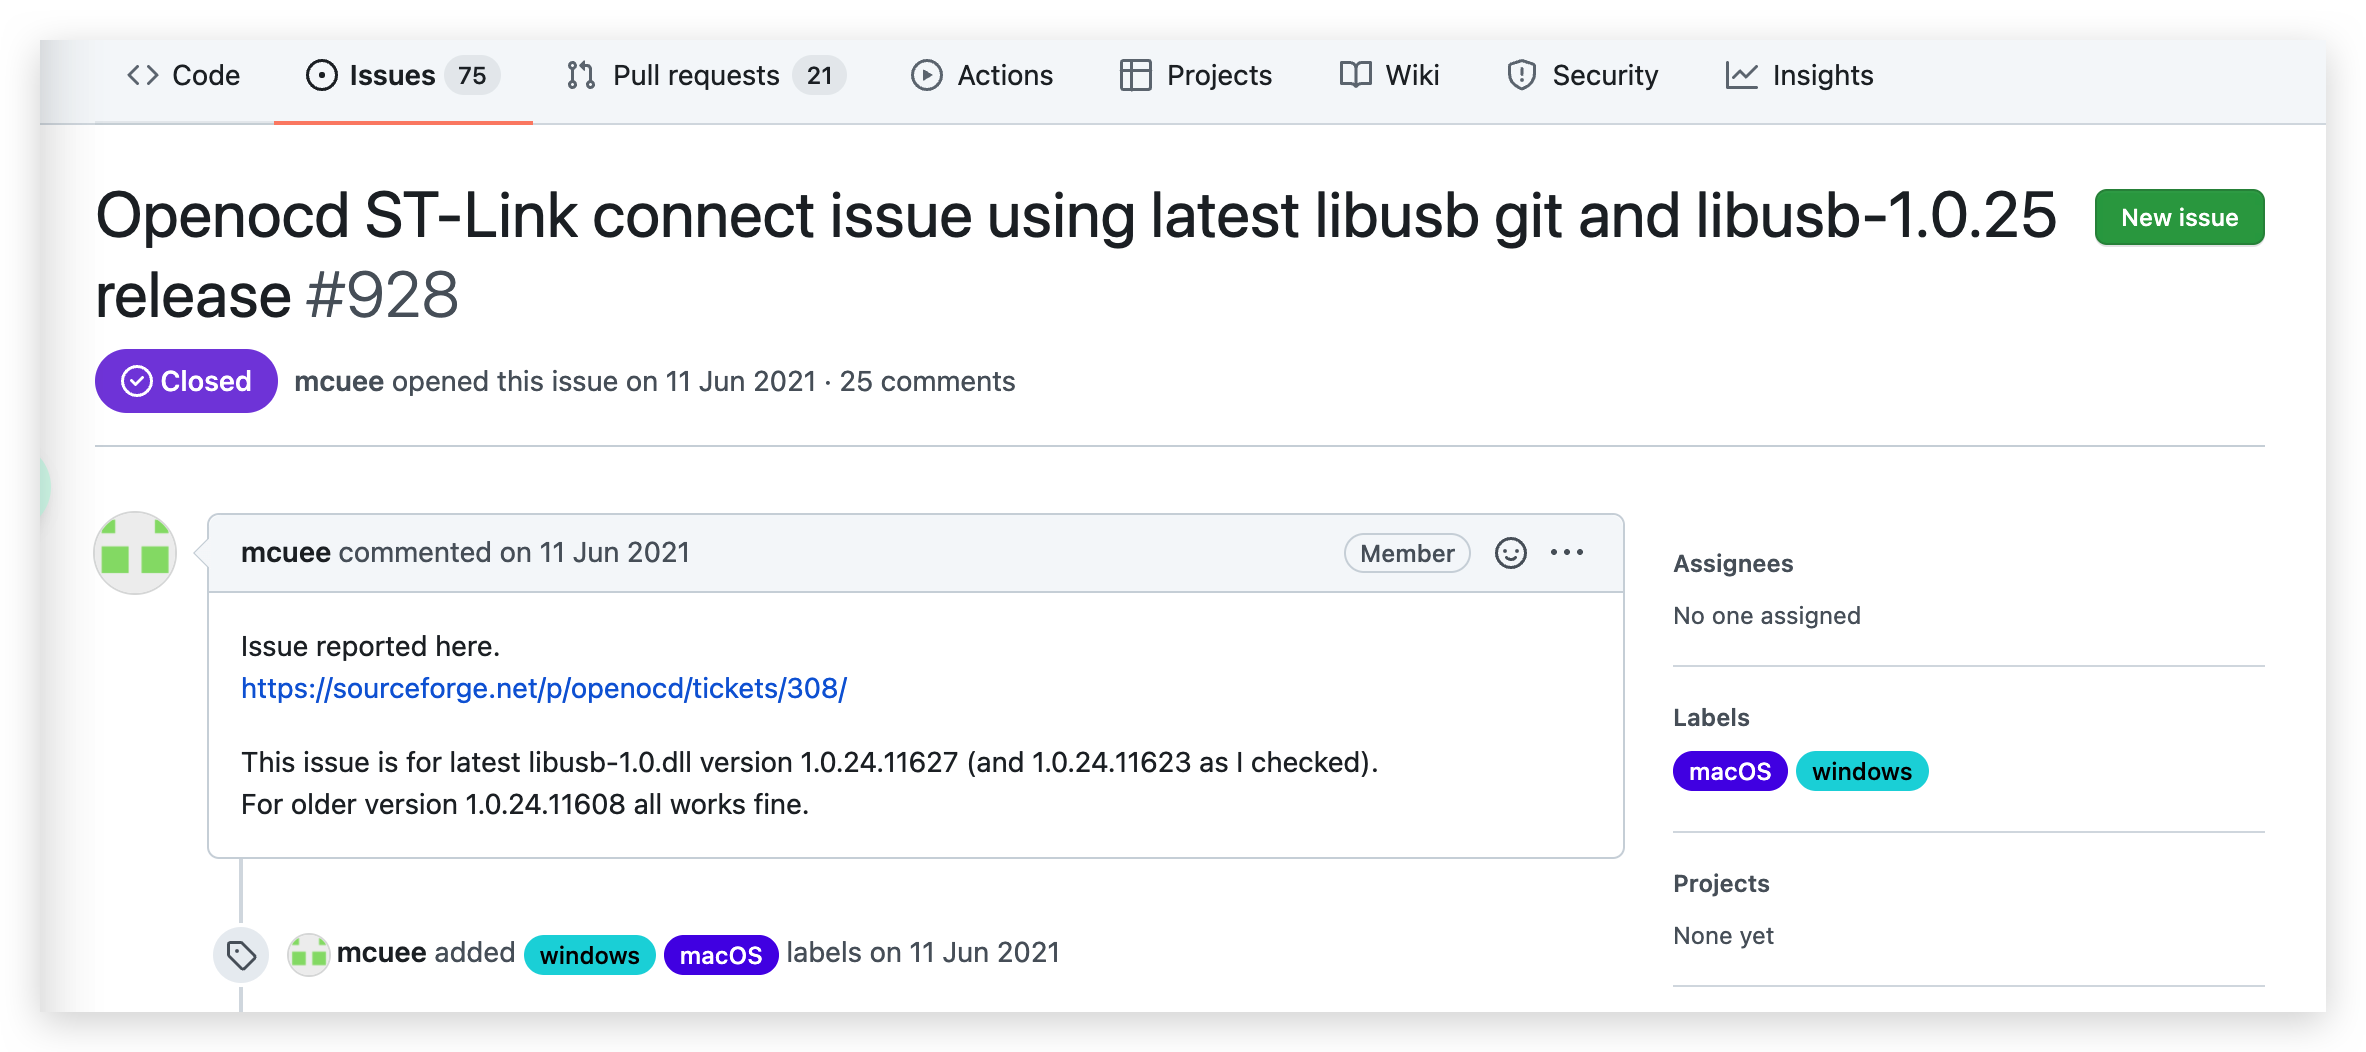
Thanks to mcuee, he got into it and analyze the problem thoroughly. It was due to the minor changes in the interface of libusb, and, OpenOCD releases it’s major update in a slow pace. The latest one was in Feb, 2021. So what happens next is predictable.
OpenOCD fixed this issue in the later updates, but without making it as an release version. So the fix was like the presented above, pull the latest source code from github and compile it is the only solution.
1 | $ brew install openocd --HEAD |
So I tried to toggle LED on and off with in the while loop, but the *.bin file seems to have something wrong.
- Either perform the first line then stop forever.
- Or, stop running at where
HAL_DELAYis.
And strangely, when using debug mode
- The while loop repeats perfectly without
HAL_DELAY.
Remembering the last time I said that ST-LINK flashing was functional?
So I suspect it has something to do with compiling.
And HAL_DELAY interrupting Debug session seems to be a known issue, but it should not be the same in terms of flashing. So currently not a clue.
Good news:
After create a new project and repeat the previous step, this problem is gone.
Previously, the direct reason was that the process hangs on
Systick_handler(). And sometimes “connect while holding reset” is really helpful.
Bad news:
Still have no clue on what exactly caused this.
- Change of
Clock Speed?
- Likely, remember that if after inputing the numbers and STM32CubeMX suggest that there’s no valid solution, don’t hit yes.
Accidentally change some of the source code in other files ?
- Maybe not
- End on 31 Mar. 2022